
Using Collaborate Ultra will allow the module leader/tutor to have the ability to see what students are online. The students can communicate with you via the chatbox from within the live session. While in your module click on the webinar link on the left-hand navigation this will take you to the webinar session page, which will show all upcoming sessions and your course room. Please note you will need to use an approved browser such as Chrome, Firefox or Safari – Internet Explorer does not work – see the Blackboard site for information.
If you would like to further guidance there is a short online training site for Durham staff and you can self-enrol here.
This guide will:
- Explain how to join your course room
- Provide a quick overview of the Ultra interface
- Provide a quick overview of the Collaborate Panel:
- Add your profile picture
- Share your PowerPoint slides
Step one: Joining your course room
Your course room is available 24/7 which can be utilised by coordinating time and dates with your students as they will join via the webinar link on the navigation. To join the session, click on the ellipsis ‘…’ next to the session, and then click ‘Join’.

Step two: Overview of the interface
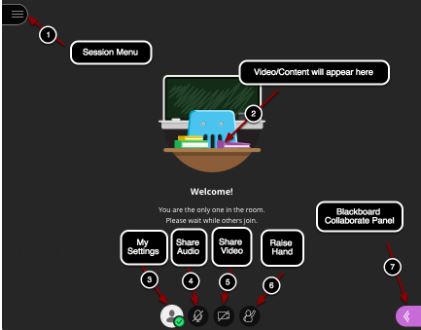
Starting with the icons at the top of the page, from left to right:
- Open session menu: This is where will start and stop the recordings for those students who do not make the live webinar.
- Content display: Your content will appear here.
- My Settings: This is a shortcut to my settings in the collaborate panel which allows you to add a photo, set up and change your audio and video settings, change your notification settings, and change your session settings.
- Share audio: Clicking this icon will toggle your microphone off and on.
- Share video: Clicking this icon will toggle your video off and on. We recommend not leaving your video on due to bandwidth.
- Raise hand: Any participant can click this icon to alternately “raise” or “lower” their hand, just like in a face-to-face classroom.
- Collaborate panel: Clicking this icon opens the Collaborate Panel, where you can access the Chat, Participant List, Share Content, and My Settings menus.
Step three: Overview of the Collaborate Panel
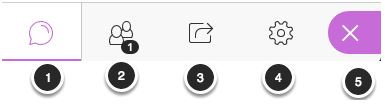
- Chat: Click the Chat button to open the Chat window.
- Participants List: Click this button to view the Participants List.
- Share Content: Click this button to share content with participants.
- You can share your PowerPoint in this section. Please be advised animations or embedded videos will not work as all ppt files are automatically converted to pdf to present to your students. Choose Share Files, Drag and drop or browse to the file you want to share. Once it is complete click Share Now and pick the slide you would like to start on.
- My Settings: Click this button to change your session settings.
- This is where you will add a profile picture. Navigate to the top to select your profile picture and click to edit. Upload any image or use your device camera to take a photo. You can choose to use this profile picture for every session. Adjust the image area. Select I Like it!
- You can also set up your microphone and camera
5. Close: Click the X button to close the Collaborate Panel.
If you need to make the Blackboard Collaborate Ultra tool active on your module site please view this blog post.